Taking a 2 day break from work to help out my dad's company. They have a major product launch lined up and I need to help them out with some designs.
Friday, June 29, 2012
Day 27-29
Sorry about not posting anything for the last 4 days. I got lost in the world of RSL(renderMan Shading Language). Its taking some time to get the first outputs, so hang on.
Tuesday, June 26, 2012
Day 26
So I have finally reached the end of the second section of Ian's book, that was taking about geometry handling in renderMan. I covered Depth of Field today and for the rest of the day, I will try to go through the C API of renderMan and Hair and Particles. Here I am just discussing Depth of Field as I understand it.
RenderMan gives an amazing amount of control on the Depth of Field. The command takes 3 parameters:

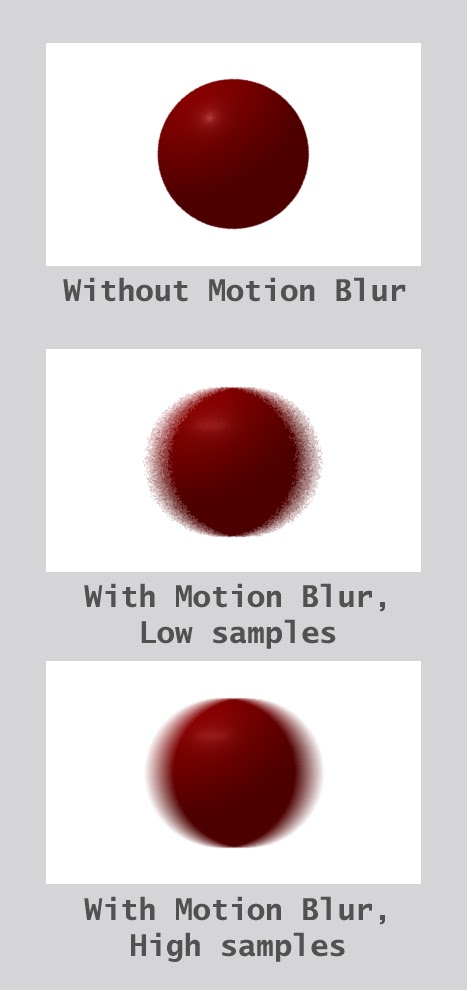
A thing to keep in mind, when using any kind of blur, is that we need to increase pixel samples. The two images below show a comparison with default pixel samples and 8 samples.
f-stop
Well thats about it for now. I might make another post today with C API results.
 |
| Depth of Field with a 270 mm lens |
- Focal Distance
- Focal Length
- F-stop
Focal Distance
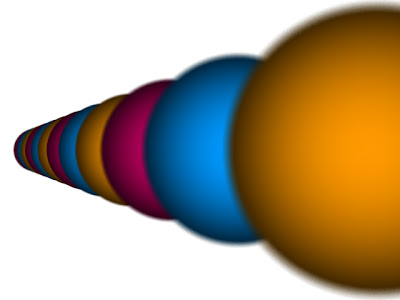
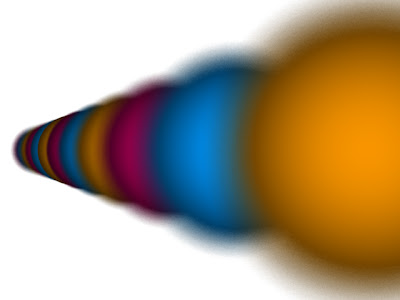
Focal Distance tells the renderer the distance from the camera at which the objects are in perfect focus. Objects closer than or farther than this distance appear blurred. Changing the focal distance and animating it can give a rake-focus kind of an effect.
As can be noticed in the picture above, on the left, the focus is on the 3rd sphere and on the left, the focus is on the 7th or 8th sphere. Also, the amount of blur on the first sphere is different.
Focal Length
As in real life photography, a longer lens creates more depth of field and a shorter lens creates less depth of field. Here, I have experimented with a 35mm, 60mm, 100mm, 150mm, 200mm, 270mm, 320mm, 400mm, 450mm and 600mm lens.
 |
| 35mm lens |
 |
| 60mm lens |
 |
| 100mm lens |
 |
| 150mm lens |
 |
| 200 mm lens |
 |
| 270mm lens |
 |
| 320mm lens |
 |
| 350mm lens |
 |
| 400mm lens |
 |
| 450mm lens |
A thing to keep in mind, when using any kind of blur, is that we need to increase pixel samples. The two images below show a comparison with default pixel samples and 8 samples.
 |
| Pixel samples need to be increased when adding blur |
Simply put, ceteris paribus, a small f-stop will produce a lot of blurring and a large f-stop will less blurring. In the renders below we can notice this phenomenon. For both the renders a focal distance of 4m was used on a 350mm lens.
 |
| f-stop of 8 produces less blurring |
 |
| f-stop of 2.8 produces more blurring |
Monday, June 25, 2012
Day 25
Back in business now. I started off with reading about the motion blur and then did some tests. To be able to visualise how it looks, I animated a sphere travelling across the screen, using .rib files. I then added motion blur to these spheres using the motion blocks, MotionBegin and MotionEnd. The first test was at low pixel samples. I then increased the pixel samples to 8 8 to get a higher quality blur. The difference can be seen in the picture below:
You can have a look at it in action:
You can have a look at it in action:
After the simple blur, I added a slightly more complicated motion path, where I specified 3 points in the motion block for renderMan to calculate the blur. Here I added favouring where I could control the amount of blur following the object and ahead of the object.
 |
| Default blur with no favouring |
 |
| Blur favouring the right hand side |
 |
| Blur favouring the left hand side |
Well, thats it for today for renderMan. Will start with depth of field tomorrow morning.
Day 22, 23 and 24
Was on a mini-vacation for the last 3 days. Went off to somewhere where there was no internet and mostly no electricity. Was able to read up a bit though. Also tried setting up depth-map shadows, it didn't work. Most probably because Ian's code is meant to work with PRMan only and I am using 3Delight. Have asked for the solution on the forum, lets see what happens.
Thursday, June 21, 2012
Day 21
Nothing much done today really. Still trying to get the momentum going. I got to reading RIB archives and using more complex models in my renderMan scenes. Here I used an Utah teapot in my scene. Ideally I would have exported a .rib from Houdini or Maya, but as I use Houdini apprentice, I can't do that and as for Maya... I don't like touching it :p
So I just got this .rib off renderman.org and I am just using it to see how the system works.
So I just got this .rib off renderman.org and I am just using it to see how the system works.
 |
| Utah teapot using the ReadArchive command |
Day 20
Today was spent going through the back story over and over again and meeting a few people for feedback on it. Will compile it and send it off to Josh soon.
Wednesday, June 20, 2012
Day 18 and 19
 |
| A bicubic patch |
I first started out with polygons using the Polygon "P" command. I made it blue, because I am cool like that :p
 |
| A polygon |
And this is a bilinear patch:
 |
| A bilinear patch |
 |
| Non-coplanar bilinear patch |
 |
| Cutting a hole into a polygon using the GeneralPolygon command |
 |
| Phong Shading to interpolate normals |
Sunday, June 17, 2012
Day 17
Started to work on several things. However, I would have to say it was a slow day. I guess I lost some momentum over the past week. Tomorrow on I try to get back into the groove and get back to work seriously. I did learn how to import a RIB archive in renderMan and also how to work with polygons and bilinear and cubic patches. Nothing to show though. Also started to watch some Houdini tutorials. Will be coming up with something in Houdini in the coming week.
Saturday, June 16, 2012
Day 15 and 16
Well... This week has been a bit slow. Haven't done much in the last two days. I will try to catch up with some stuff today. Working on a Sunday :p
Wednesday, June 13, 2012
Day 14
I don't think I will get much work done today, it's my Mum's birthday. Will try to do some sketches and go through the back story Josh sent me..
Day 13 (contd.)
Got the displacement shader working in renderMan!!! It JUST works though.. Don't understand completely how to make it work. The code in Ian's book was incomplete, or it works only on PRMan. But I think he missed out on:
Attribute "displacementbound" "sphere" [ <bound> ] "coordinatesystem" [ <space> ]
Here is the output:

Attribute "displacementbound" "sphere" [ <bound> ] "coordinatesystem" [ <space> ]
Here is the output:
Day 13
So today I took a break from renderMan and started doing some rough sketches for hovercraft designs. I am terribly rusty as I am drawing properly after 4-5 years. Line quality just sucks and I am not able to draw a straight line at the moment :D. But it should be fine as I have 2 months to get done with it. I am posting these here as the designs are not mine and also, they look crap and won't be used in production anyways. I am just trying to get the bad drawings out right now so that I can get to better ideas and drafts soon.. I just did 8-10 sketches today and these 3 looked the best (SERIOUSLY- The others were even worse). Tomorrow I start to do proper perspective studies, back to the basics, drawing cubes and all :p Gotta love basic geometric shapes..
 |
| Weird hovercraft |
 |
| Weirder hovercraft |
 |
| Weirdest hovercraft |
Tuesday, June 12, 2012
Day 12
In the first part of the day I started off with renderMan. By now I have come to terms with the fact that I wont be able to cover 25 pages of the book everyday. Its painfully slow going, but I am getting it and its really great. The amount of control you get on the appearance is really amazing and I haven't even started writing my own shaders yet.
Painted Plastic Surface
Painted plastic is one of the more complex surface shaders. Along with the regular Ks, Ka, Kd, roughness, specularcolor attributes it comes with a 'texturename' attribute with which we can attach textures to the shader. Here I have attached a marble like texture to the shader.
Today I was trying inbuilt surface shaders that come with renderMan. This is the base setup I used for all my scenes.
 |
| Basic setup used for all the scenes |
The camera has been translated 5 units back in z-axis and we have zoomed in using a fov of 30 degrees. There are two lights in the scene, a key-light which is a spotlight positioned at (-2, 2, -2) and aiming at (0, 0, 0), having an intensity of 7 and a fill-light which is an ambient light with an intensity of 0.3. As always I will be testing out everything on a sphere.
Constant Surface
This is, I guess, the simplest surface shader. It just takes the colour that we define in the RIB and uses it as the output colour, completely ignoring the lighting setup in the scene.
 |
| The constant surface |
Matte Surface
This is more like the lambert shader in Maya. It gives a diffuse and an ambient reflection. The amount of the diffuse and the ambient light scattered by the surface can be specified by Ka(coefficient of ambient reflection) and Kd(coefficient of diffuse reflection). I experimented with both the parameters to see how it effects the output.
 |
| Testing the effect of increasing Kd from 0 to 1 |
 |
| Testing the effect of increasing Ka from 0 to 1 |
Metal Surface
The position of the specular highlight on the metal surface shader is highly dependent on the position of the observer. We can control the overall look of the object by adjusting the Ks(the coefficient of specular reflection) and the roughness parameters. Surface with high roughness produces a less sharply defined highlight and a smooth surface produces a small and sharp bright point.
 |
| Testing the effect of Ks for 0.5, 1.0, 2.0 and 4.0 |
 |
| Testing the effect for different values of Roughness Ks = 1.0 for all the images |
Plastic Surface
Plastic surface is one of the more versatile surfaces. It has the Kd and Ks parameters using which it can be made to appear like metal, plastic or matte surface.
 |
| Plastic surface shader adjusted to look like different surfaces |
Also, we have the option to control the specular colour. In the images below I have set the specular colour to red, yellow and white.
 |
| Plastic surface shader with different coloured highlights |
Painted plastic is one of the more complex surface shaders. Along with the regular Ks, Ka, Kd, roughness, specularcolor attributes it comes with a 'texturename' attribute with which we can attach textures to the shader. Here I have attached a marble like texture to the shader.
 |
| Painted Plastic suface with a marble-like texture |
Well thats all for shaders now. These are just regular inbuilt surface shaders which ship with all the renderMan compliant renderers. I will be getting extensively into shaders once I am done with the general stuff. Tomorrow I will get into more complex surfaces(a refreshing break from spheres) like patches, polygons etc. Thats it for today.
Monday, June 11, 2012
Day 11 (contd..)
Also, I uploaded some of the pictures from the Recce on the 1st June. Its slow and tiring work. Uploaded around 80 odd today. Will try to get everything up in a couple of days. The group members can access the pictures at:
http://photobucket.com/recce1
The password is the normal one we have for everything now. Check the group wall if you don't know it.
http://photobucket.com/recce1
The password is the normal one we have for everything now. Check the group wall if you don't know it.
Day 11
Okay so now I am back on track with RenderMan. Starting to get into more complicated things(still spheres though, love them). I tried out a few camera settings and various renderMan light shaders that I learned about on Saturday.
This is the general setup I am using for the files today:

RenderMan Cameras
The field of view(fov). RenderMan, by default, uses a 90 degree fov, which results in a stretching artifact at the edges. This is an image with a 30 degree fov, compared with one with a 90 degree image.
As you can see the image on the left is not stretched at the edges.
Pixel Samples. The pixel samples determine the amount of points that are calculated per pixel. A higher number gives a sharper image and a lower number gives more artifacts. Here are some tests I did with PixelSamples values 1 1, 2 2 and 4 4.
Exposure settings. I also tried out various exposure settings for the camera, gamma correcting the images. In the output below you can see that the image on the right has no gamma correction whereas the image on the right is gamma corrected and looks blown out.

RenderMan Light Shaders
I started off with the simple point light shader. As expected it illuminates the facing surface. As an input it takes a "from" position and an intensity. The intensity needs to be set pretty high as the falloff is quadratic by default. Also, we can set which object receives light on a per object basis. In the output below the sphere on the left receives illumination from a point light source and the one on the right doesn't.
Then I experimented with the distant light shader, that basically works like a normal Maya directional light. It takes a "to" position and an intensity.
Spot Light shader is one of the more complex one in renderMan as it has a lot of attributes. In the three outputs below I have set the coneDeltaAngle differently, giving me a different penumbra. This essentially sets the falloff from the brightest central part of the light to the outer edge, giving softer edges, if desired.

This is the general setup I am using for the files today:

RenderMan Cameras
The field of view(fov). RenderMan, by default, uses a 90 degree fov, which results in a stretching artifact at the edges. This is an image with a 30 degree fov, compared with one with a 90 degree image.
 |
| fov 30 and fov 90 |
Pixel Samples. The pixel samples determine the amount of points that are calculated per pixel. A higher number gives a sharper image and a lower number gives more artifacts. Here are some tests I did with PixelSamples values 1 1, 2 2 and 4 4.
| Pixel samples 1 1 |
| Pixel samples 2 2 |
| Pixel samples 4 4 |
I started off with the simple point light shader. As expected it illuminates the facing surface. As an input it takes a "from" position and an intensity. The intensity needs to be set pretty high as the falloff is quadratic by default. Also, we can set which object receives light on a per object basis. In the output below the sphere on the left receives illumination from a point light source and the one on the right doesn't.
 |
| Point light shader with per object illumination set |
 |
| Distant light shader |
 |
| coneDeltaAngle = 0.0 giving a hard edge |
 |
| coneDeltaAngle = 0.1 giving a softer edge |
 |
| coneDeltaAngle = 0.25 giving a significantly softer edge |
Ambient light shader just flat shades the sphere (as expected)
 |
| Ambient Light Shader |
Compound Light. Here I used a spotlight shader with a large cone angle 0.45 and a large delta angle and an ambient light shader with low intensity (0.2) to give a fill light to fake GI. Its not much, but I am pretty pleased with the result for now.
Thats all from renderMan today> Tomorrow I will try to import a few more complex objects and work with materials other than the simple plastic used here.
Subscribe to:
Posts (Atom)