Saturday, November 10, 2012

HDR Lighting

This is officially the first all-nighter for this year :)


Tonight I am going through the basics of HDR lighting. I have picked up a tutorial from DT and I am trying to finish it off. The acquisition that we have done for our project has some issues at the moment so it will be a while till I get the things the way I need them to light properly. It's good that we are having these issues now. It would be simply horrible to have these problems in March.
here is some output from my night.

Output without the lens shader

Output with the lens shader
Hopefully we will have a working version of the shot by Tuesday. Ciao...

Friday, November 9, 2012

Pipeline for proof of concept test

Hi, I have to take yet another break form my dynamics work because our tutors for the project were not very happy with the story that we came up with. SO we have to change that now. Also, they wanted to see a proof of concept, so we just pulled out a few cameras and went into the town to shoot a bit of stuff and we are trying to integrate the assets that we have into the backplates. This is the pipeline we have for this mini-project.


We just have 3 days to do this, so this is going to be a lot of fun :)

Thursday, October 25, 2012

The BrickMaker tool

So, I have been working on this BrickMaker tool in Houdini for a couple of days now and I would say that it is done(at least I am leaving it here). I am not taking it any further as this is just a part of my learning process and I need to move on. We would be using it in our project titled "EGO" for destruction simulations.

Here are some results form the tool. These have been rendered out using Mantra, using a simple Mantra shader with a default environment light.


The tool can take any input geometry and convert it into bricks(or Lego blocks) The instancing bits can be changed to look like anything, Lego, plain blocks, matchsticks etc. In the images below you can see how the tool can be applied to any geometry.

Hmm... A Lego teapot!

OH MY GOD!! I am Lego too!!


Here is the little user-interface for the tool

Custom UI

You have several options. You can have the default teapot, or you can source your own geometry using the Custom Object Path. If you are using the default teapot, you can control it's size and position from within this parameter box. Offset allows you to increase/decrease the number of units the geometry is constructed with. We also have some access to the shader, so you can chose to have various types of colours. There is also an option to Animate the bricks which makes the geometry appear slowly. Appear order lets you decide, how you want the blocks to appear. And with build speed you can control the speed with which the blocks are placed to construct the geometry.

Right now I am doing some tests on it. I am currently rendering out some animations that I made using this tool. They should be up by today evening or tomorrow morning.

Cheers! Thanks for reading!

BrickMaker update: Use Lego for your geometry now!

I am extending the brickMaker tool today. Started off by making a Lego version of it. Added the capability to instance geometry at render time, thus giving higher detail, but still keeping the main scene file light and agile. In principle, the instance geometry, which is a Lego brick in this case, can be made as complex as required now.

Utah teapot, made out of Lego bricks

Wednesday, October 24, 2012

Houdini Brick Tool

So, now I am learning how to use Attributes, Groups and Expressions properly. Also trying to properly understand how the Digital Asset system works in Houdini. This is a little network that takes any geo and turns it into a brick map. You can control the resolution dictating how many bricks you want to have there. Once fully developed, I think it can be used to create some cool using procedural animation such as an effect where the cubes just come together and form this shape.

Some output from the tool:

An Utah teapot at 2x2x2 resolution

An Utah teapot at 4x4x4 resolution


An Utah teapot at 4x4x4 resolution

A Torus at 4x4x4 resolution

A Torus at 2x2x2 resolution

A Torus at 2x2x2 resolution
I would be working further on this tool tomorrow so watch out for the tree structure, UI and more output.

Rough Houdini RBD sim


I am continuing to explore Houdini in increasing depth. In the last couple of days I explored the RBD engine of Houdini.


This is a rough simulation I pulled out in 20 minutes. It is not very sophisticated at the moment, but it will get better soon.

Watch a video of the sim on Vimeo HERE!

Thursday, October 18, 2012

(RE)starting with Houdini

Well... I have always loved the way Houdini works and have been using it for a couple of months now, but actually, we never really got finally introduced. So, there are couple of intermediate to advanced things I have a hang of, but then there are couple of very basic things that I have NO idea about. SO, I decided that before really diving into this huge sim, it would be nice to understand the basics better. Now, for the next couple of weeks I am going through the basic videos. It gets really dull at times, but I am getting a wealth of information, I had no idea about. So here goes what I did today.

createAttribute with colour override
I have started off with trying to understand attributes and groups a bit better. So I made a grid and then output some groups out of the polyExtrude and then based on the group gave them different colours.

Creating groups using polyExtrude

Here I just displaced the $TY with a random value using rand($PT) to create a mountainSop-ish displacement.

Randomising the y-coordinate on a per-point basis
Here I created a new set of attributes and then copied them over to yet another set. You can see the spreadsheet and the per-point attrib values displayed in the viewport.


WTF did I do!! I was trying to project a path on a grid, but instead of using the ray sop used the rails sop. Houdini had a minor heart attack :p

OOPS!
That's more like it

A path projected on a grid with a mountain sop on it

Sunday, October 14, 2012

It's been a long break!

Well I don't even remember what day it is.. Will calculate that and get back to the habit of updating the work log more often. Over the last couple of months we have done major story development, submitted and presented the proposal, got some feedback and have extended our team a bit. It's been a bit slow, but I would say it has been intentional. I think with all the paperwork out of the way, I can now get back into actually DOING things. For the next couple of months, I am concentrating all my energies towards the FX TD responsibilities I have. I am starting out with basic Houdini work and as time progresses I will get to more advanced development.

Wednesday, July 11, 2012

Day 31-42

Hello!!

Weird things happen. I got up last week with pain in my jaw. Went to the doctor and I seem to have dislocated it in my sleep somehow. So have been on painkillers and sleeping for 12-14 hours a day. AND that would explain me not updating my work log.

Now I am slowly trying to get to work whenever I get out of my drug induced sleep :p
I have started with starting shader development. Have been reading a bit of RSL and experimenting with very basic shaders. Still VERY groggy..

Utah Teapot with hsv ramp shader
Here I developed a shader that gives a ramp based on hsv values and applied it to the Utah teapot. Ofcourse I don't yet know how to get the projections right, so everything is a bit messed up. The shader can be seen on a plane in the image below.

hsv ramp shader applied on a plane

And here I have applied it on a sphere. It can be seen that the shading is a regular plastic variety and as a texture we have a hsv ramp. I used 

Ct = color "hsv" (s,t,1);

to get this effect.

The shader applied to a sphere with plastic shader
I started with developing simpler shaders and understanding how the renderMan shaders are actually written. So I built up the renderMan constant shader and applied it to a sphere and a teapot. Nothing special going on here, we just premultiply the opacity with the input colour and assign the value obtaied to Ci:

Ci = Oi * Cs


However, the constant shader is not very useful as it doesn't give us any clue about the 3D shape of the object being rendered. So then I moved on to development of a Diffuse shader. This shader takes into account the diffuse reflections and calculated the amount of light being reflected based on the normals of the surface.

Ci = Cs * diffuse(Nf) * Oi


The shader has been applied to a sphere and a teapot.


This shader, is very close to the renderMan Matte shader except for that it doesn't take into account the ambient reflections. We can simply add the ambient reflections by modifying the Ci in this way:

Ci = Oi * Cs * (Ka * ambient() + Kd * diffuse(Nf))


As we can now compare, the objects react better to the ambient light in the scene.


I also went on to develop a metal and a plastic shader based on the metal and plastic materials that are built in renderMan. Here is the output for that:


Once I was done with developing all the basic shaders I started developing some textures. Here I have developed a vertical ramp, horizontal ramp in black and white and then I added some colour into it and the ramp interpolates automatically form black to purple. The output for the operation is here:


A horizontal ramp

A vertical ramp

A horizontal coloured ramp

Friday, June 29, 2012

Day 30 and 31

Taking a 2 day break from work to help out my dad's company. They have a major product launch lined up and I need to help them out with some designs.

Day 27-29

Sorry about not posting anything for the last 4 days. I got lost in the world of RSL(renderMan Shading Language). Its taking some time to get the first outputs, so hang on.

Tuesday, June 26, 2012

Day 26

So I have finally reached the end of the second section of Ian's book, that was taking about geometry handling in renderMan. I covered Depth of Field today and for the rest of the day, I will try to go through the C API of renderMan and Hair and Particles. Here I am just discussing Depth of Field as I understand it.

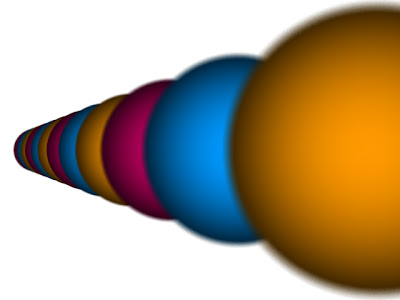
Depth of Field with a 270 mm lens
RenderMan gives an amazing amount of control on the Depth of Field. The command takes 3 parameters:
  • Focal Distance
  • Focal Length
  • F-stop
Focal Distance


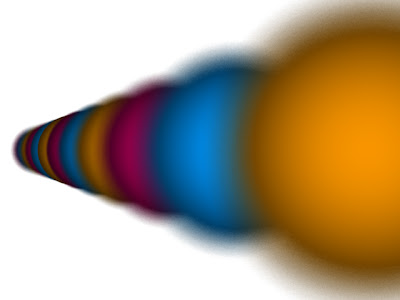
Focal Distance tells the renderer the distance from the camera at which the objects are in perfect focus. Objects closer than or farther than this distance appear blurred. Changing the focal distance and animating it can give a rake-focus kind of an effect.


As can be noticed in the picture above, on the left, the focus is on the 3rd sphere and on the left, the focus is on the 7th or 8th sphere. Also, the amount of blur on the first sphere is different.

Focal Length

As in real life photography, a longer lens creates more depth of field and a shorter lens creates less depth of field. Here, I have experimented with a 35mm, 60mm, 100mm, 150mm, 200mm, 270mm, 320mm, 400mm, 450mm and 600mm lens.

35mm lens

60mm lens

100mm lens

150mm lens

200 mm lens

270mm lens
320mm lens

350mm lens

400mm lens

450mm lens

 A thing to keep in mind, when using any kind of blur, is that we need to increase pixel samples. The two images below show a comparison with default pixel samples and 8 samples.

Pixel samples need to be increased when adding blur
f-stop

Simply put, ceteris paribus, a small f-stop will produce a lot of blurring and a large f-stop will less blurring. In the renders below we can notice this phenomenon. For both the renders a focal distance of 4m was used on a 350mm lens.

f-stop of 8 produces less blurring

f-stop of 2.8 produces more blurring
 Well thats about it for now. I might make another post today with C API results.